Tech Tips
The "How To" Series offered by Abicor Binzel
Here we have assembled several guides on the various types of welding for people who have just started welding.
Jump to:
Advantages of MIG welding:
- Easiest form of welding to learn
- Better control on thin metals
- Good for out-of-position welding (eg. vertical or overhead)
- Deep penetration for welding thick sections
- Same power source for solid and flux cored (gasless) wire
Back to top
Advantages of TIG welding:
- Weld more metals and alloys than any other process: TIG welders can be used to weld steel, stainless steel, chromoly, aluminum, nickel alloys, magnesium, copper, brass, bronze, and even gold. TIG is a useful welding process for welding wagons, bike frames, lawn mowers, door handles, fenders, and more.
- Create high quality, clean welds: With superior arc and weld puddle control, TIG allows you to create clean welds when appearances count. Because the heat input is often controlled by pressing on a foot pedal, similar to driving a car, TIG welding allows you to heat up or cool down the weld puddle giving you precise weld bead control. This makes TIG welding ideal for cosmetic welds like sculptures and automotive welds.
- No sparks or spatter: Because only the necessary amount of filler metal is added to the welding puddle, no spatter or sparks are produced (if the metal being welded is clean).
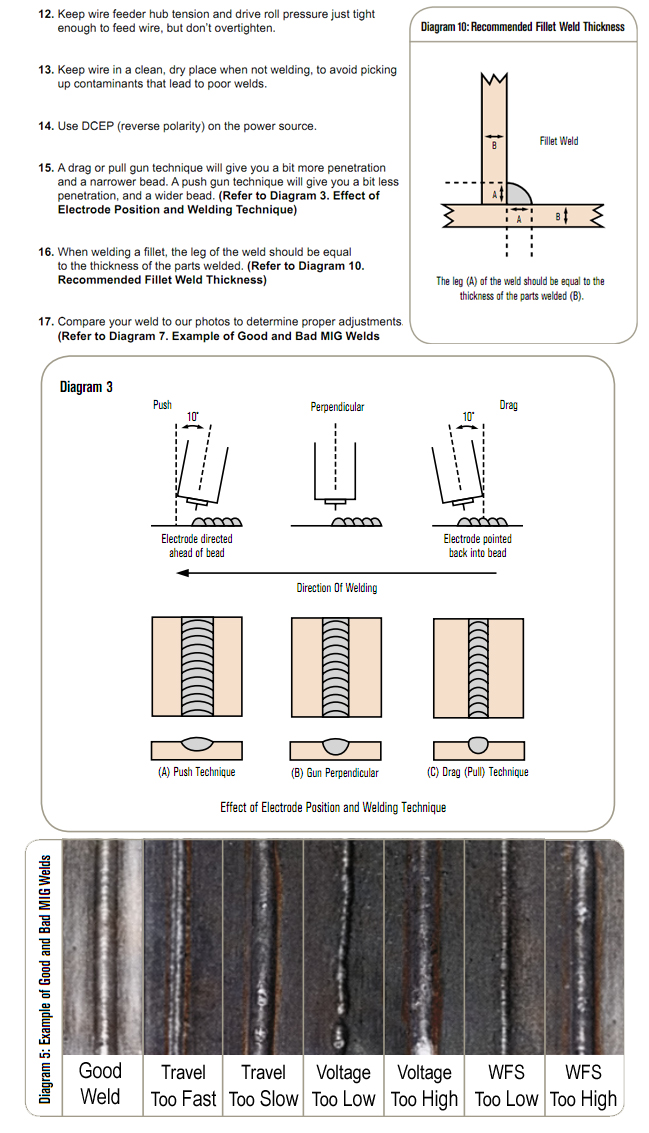
- No flux or slag: Because the Argon gas protects the weld puddle from contamination, no flux is required or used in TIG welding and there is no slag to block your view of the weld puddle. Also, the finished weld will not have slag to remove between weld passes.
- No smoke or fumes: TIG welding does not create smoke or fumes, unless the base metal being welded contains contaminants or elements such as, oil, grease, paint, lead or zinc. The base metal should be cleaned before welding.
- Use one shielding gas (Argon) for all applications: Because Argon can be used to TIG weld all metals and thicknesses you only need one type of gas in your shop to handle all of your welding projects.
- Weld in all positions: TIG welds can be made in all positions - flat, horizontal, vertical or overhead. Perfect for roll cages and inside confined areas.
TIG Setup
1. Connect Torch
When using an air-cooled torch, use the adapter from your accessory package and plug the torch into the front of your machine. Also connect your gas hose and regulator.
2. Connect Remote Control
Plug your foot pedal or fingertip control into the machine.
3. Connect Work Clamp
Plug your work clamp (sometimes referred to as a ground clamp) into the machine. Clamp the other end to your work piece or work table.
4. Select Polarity
For aluminum welding, switch your amperage setting on the front panel to AC. For steel and steel alloy welding, switch your amperage setting to DCEN. (For Stick welding, switch your amperage setting to DCEP.)
5. Prepare Tungsten
Grind your tungsten to a point. When welding on aluminum, the tungsten will begin to form a ball. If the ball grows to the same diameter as your tungsten, repoint the tungsten. Grind in the long direction and make the point roughly 2-1/2 times as long as the diameter. Use a 200 grit or finer grinding wheel. Do not use the wheel for other jobs or tungsten can become contaminated causing lower weld quality.
6. Assemble Torch
Loosen the back cap and remove the 3/32" diameter tungsten from your torch (it has an orange stripe). Remove the nozzle and copper collet pieces from your torch. Put the collet and collet body back into the torch and tighten. Put the nozzle back onto the torch.
7. Install Tungsten Place the tungsten into the collet. Leave about 1/8 to 1/4 in. sticking out of the collet (not more than the diameter of the cup). Tighten the back cap.
8. Check and Connect Power Make sure the power supply you are connecting to matches the rating of your machine (see rating label on unit). If your machine is supplied with a plug, plug it into the appropriate power outlet when you are ready to begin welding.You may need to purchase a plug to match your receptacle. If your machine is not supplied with a plug, connect according to the procedure provided in the Owner's Manual.
How to TIG Weld
1. Safety
Make sure you have all the necessary safety equipment and appropriate clothing. For example,
- Dry, hole-free insulating gloves and body protection
- Approved welding helmet fitted with a proper shade of filter lenses to protect your face and eyes when welding or watching
- Approved safety glasses with side shields under your helmet
- Protective clothing made from durable, flame-resistant material (leather, heavy cotton, or wool) and foot protection.
2. Torch Placement
Hold the TIG torch in your hand at a 70° or 80° angle. Raise the torch so that the tungsten is off of the work piece no more than 1/8 to 1/4 in. Don't let the tungsten touch the work piece or it will contaminate your material and you will need to regrind your tungsten.
3. Foot Pedal Control
Practice controlling the heat with the foot pedal to see the weld puddle increase and decrease. Ideally, you want your weld puddle to be about 1/4 inch wide. Keep your puddle size consistent so it doesn't grow, shrink, spread or narrow while you are welding.
4. Filler Metal
Pick up your filler metal in your other hand so it rests horizontally at a 15° angle from the work piece - not pointed down. Heat up the base metal and gently dab the filler into the puddle. Dab rather quickly so you don't leave large deposits.
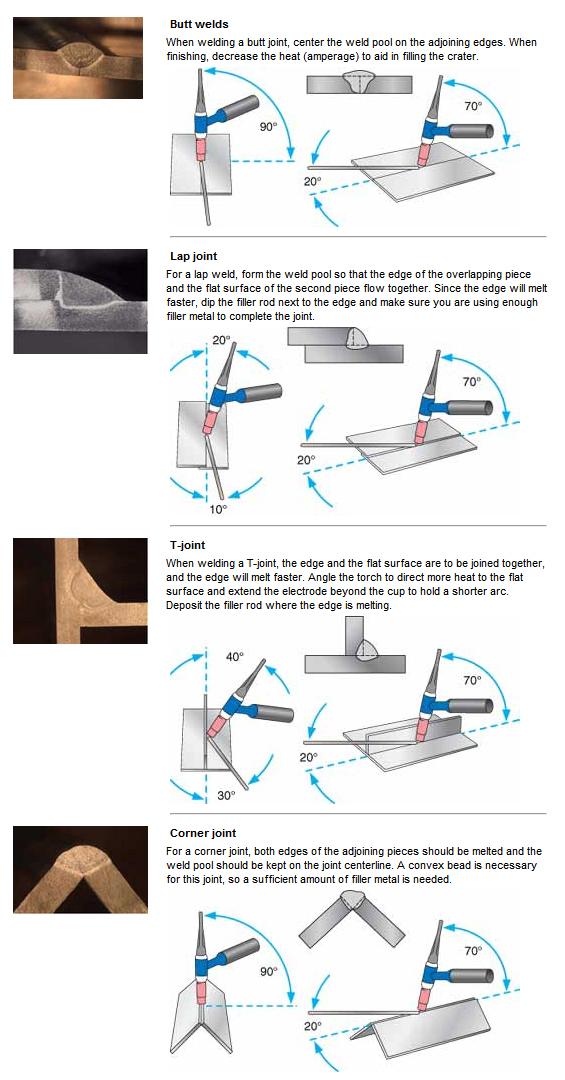
How do I position my TIG torch for different types of welds?